")


...and 3 years later, we finally have it!
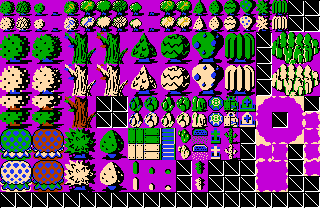
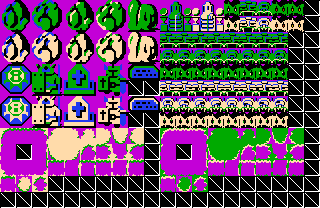
What this pack does is provide a variety of classic overworld tiles in such a manner that they can be seamlessly stacked on top of each other using layers.
The primary use for this (that I find) is color variety. Because the default classic tileset is very limited in its color scope, particularly in the overworld palette where nearly every obstacle or item is a single color, it can easily get exhausting seeing green, brown, and the occasional white highlight after so long. But at the same time, the color coordination between the overworld's Level-Palette CSets (2, 3, 4) and the game's Main-Palette CSets (0, 1, 5, 7, 8, 10, 11) is a perfect fit, and they can look very natural when used together.
The problem is, because you can only use one CSet per tile at a time, tiles using a Main-Palette CSet will not only have the color of the obstacle or item changed, but the color of the ground will be changed as well. And while you could configure a large amount of 8-bit tiles to use multiple CSets that cover every possible color combination option, using the layerable tiles provided here is much easier, and requires far less manual tile-coloring.
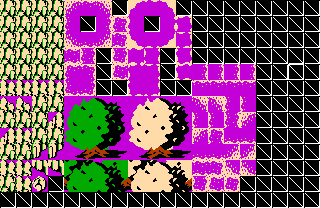
For reference, here's a screenshot of a scene I made using layerable mountain tiles: mountain cave with layers. Now here's the same scene using the same tiles, but without layers: mountain cave without layers. As you can see in the second shot, the ground at the base of the colored rocks forms a clumsy color block that looks outright misplaced despite the tiles being positioned correctly. Further, the mountain corner tiles stacked on top of the other mountain tiles only show a transparent black rather than revealing the tile that should be beneath them. The same concept applies to trees and other tiles in this pack. (Also note the sandy borders in action at the edge of the red and blue ground transitions.)
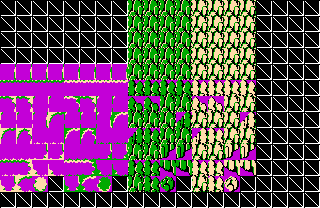
The secondary use for this (that I find) is its support for relational mode. The tall 4-column-wide tile collections on page 2 and 3 are placed together in such a way that you can make them into combos in that precise order (select the entire 4 columns and hit "M" to make them into combos all at once), then enable relational mode (press "O"), select the first tile in the collection, and start drawing. As you drag the cursor around the screen, the relational mode will automatically fill in the borders. To undo what you've drawn, hold "shift" and continue drawing. This eliminates much of the tedium of setting up complicated borders. Just remember to include the 4x4 block of blank tiles at the top of the relational columns for the border tiles when making them into combos.
Finally, to get the purple color so that you can correctly import these tiles, pick the Quest menu, go to Graphics -> Palettes -> Levels, double-click "000 - Zelda 1 Overworld," and with the top row (numbered "2" for CSet 2) selected, click the Edit button. Now with the first black in the row of colors selected, press "1" on the numpad to "lower" the red channel from 0 to 63, then press "3" to do the same to the blue channel (similarly, press "7" and "9" to raise the red and blue channels back). Click OK, then click Done, then click Done again. Now you can open the tile page and grab the tiles from these sheets without having your solid blacks turn transparent. And if you want to reset the purple to black, or any other color, just edit the palette again after the tiles have been imported. (This assumes you're using the standard classic tileset, of course.)
All in all, a simple way to bring complex variety to classic designs.
Modular Classic Expansion Tiles
Overview
Creator:
Anthus
Added: 15 Apr 2017
Downloads: 32
|
Download Tile (24.82 KB) |
||
| Tags: Background, Collection, Edited, Greenery, Ground, Misc, Mountains, Original, Water | |||
Information
Have you ever wanted to pretend you are using RPG Maker when drawing screens in Classic? Well, now you CAN!
About Reviews
Description
(literally copied from the forum thread)
This is the Modular Classic Expansion! So I have had this idea for a while, and what this aims to do is make it easier to make elaborate screens in Classic without the need for multiple versions of the same tile to use with the varying c-sets. To achieve this, we will be using various tiles that can be layered. It might seem trivial at first, but once set up, making screens with lotsa colors is pretty easy. And to boot, there are even relational drawing mode tiles set up for Classic mountains, water borders, and custom grass/ sand borders. This is still a WIP and likely won't be finished, and I've only tested it with two palettes I've made, but I like it a lot so far, and am happy enough with it to share it. There are at the very least some new borders (custom) and most Classic objects exist without a background which might make making your own edits easier.
These remove the ground color, and replace it with a transparent color in each tile (except where the ground color is used in the object depicted in the tile). That transparent color is pink here, but in the NES tileset, black was the transparent background color used for outlines. That brings me to the only downside of this: If you intend to use these with the regular Classic tiles (which you probably will) you will need to know what they are, and how they are set up, cause in Classic's default palettes, they will appear mostly black, and look wrong as they are intended to be layered.
Credits
Nintendo.
Boredom.
Boredom.

