


Well, I would've been able to beat the quest if it weren't for the fact that Level 9 was completely unplayable and unbeatable, even with cheats.
The quest as a whole, wasn't that great at all. This quest just suffered a large amount of bugs and issues, some of which I had to cheat my way through because I keep getting stuck on the top-left corner when I entered some warps and collected a few Triforce pieces. Screen design as a whole isn't that great, with weird sudden colour transitions and loads of tile errors. The dungeons are all very bland and empty, with the occasional detail here and there, but as a whole, it's very poorly done. The difficulty is also all over the place, some areas being easier than others. I don't understand why you have a Death Knight in a room of a dungeon, and then use a Splitting Darknut as the boss when the splitter is a lot easier to kill. Most secrets are illogical and look really odd. I also was insanely dependent on the Lens, mostly because the later dungeons just became a walk-through maze, which isn't fun at all.
All in all, there are loads of things that can be improved with this quest. There are countless bugs and I just couldn't enjoy the quest. I was torn between a 0 or a 1, but I'm going to go right in the middle and say 0.5/5, which rounds up to a 1. With TONS of polish and bug-squishing, this could turn out to be a pretty neat miniquest.
- Current Location:
- PureZC
- » PureZC Forums
- » Quests
- » "The Legend of Zelda: Link's Peril"
"The Legend of Zelda: Link's Peril"

Overview
Feature Quest
Creator:
UnityAlex
Genre: Dungeon Romper
Added: 05 Oct 2015
Updated: 09 Oct 2015
ZC Version: 2.50
Downloads: 603
Rating[?]:
")
|
Download Quest (1.1 MB) |
Information
This quest is very old and I was very new to Zelda Classic when making it. I was too ambitious and the quest suffered as a result. Please don't use this to judge my abilities for future works. Thank you.
About Reviews Comments Forum Topics
Description
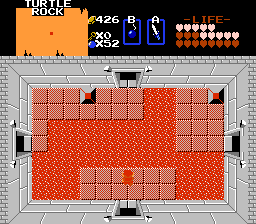
This quest is linear, involving getting new items to unlock new areas of the map. For example, to the right of the first screen, there is a river blocking your way. Later, you will get the hookshot, allowing you to scross it, and access the next dungeon. There are 10 dungeons total, one not being required. These include: Hyrule Trial, Wiltered Island, Forbidden Offset, Moonlit Caverns, Hell Shrine, Underground, Turtle Rock, Skull Woods, and Tower of Hera. Lots of items have been modified to make the game more balanced, and a new sword has been added: The Biggoron Sword. There is a total of 20 heart containers, and you start with 5. It has a steep difficulty curve if you don't follow the walk through.
Story
After the events of Zelda II, Ganon returns and attacks link while he is not expecting it. Link somehow lost the battle, even though possessing the whole triforce, and Ganon got away with the Triforce of Wisdom and the Triforce of Power. He loses the Triforce of Power, and it smashes in an explosion so great, it sends 8 pieces across Hyrule. In the great explosion, the Master Sword was sent into the depths of Hell, as were the scrolls that Link can find to improve his abilities. Ganon kidnaps Zelda to get Link to give up the Triforce of Courage, but Link refuses. He sets out to get all 8 pieces of the Triforce of Power and stop Ganon.
Tips & Cheats
Follow the walkthrough and you'll be fine.
Credits
UnityAlex, and the Zelda Classic Team.
Arkia


Posted 18 October 2015 - 10:16 PM
Overall this would be a decent quest, but it is held back by numerous bugs and some questionable design choices.
The quest is mostly straight forward, however there are several maze paths in the game with no in-game hints on how to solve any of them. It's clear that this quest was intended to be played with the included walkthrough, but it would be nice if it could be completed without it. There are also several instances of triggers that didn't seem to serve any purpose at all. Some notable examples being an arrow block at the beginning of a dungeon that does nothing, a cave entrance that can be bombed to reveal a different tile for the same cave entrance, and a bush that can have a sequence of items used on it and then just disappears.
The bugs are what really plague this quest though. Using F6 continue can lead you to strange places and get you stuck inside of walls in certain dungeons. Some of the Triforce pieces don't warp you out of the dungeon properly and one dungeon doesn't even have a proper exit at all. Also at the time of writing it seems this quest cannot actually be completed, since a staircase in one of the dungeons leads into a wall and prevents the player from beating the dungeon as well as the rest of the game.
All of these issues should be pretty easy to fix though, and if they do get fixed I think this a pretty fun quest that's worth playing.
- Rainst0rm4759 likes this


Deedee

Posted 07 October 2015 - 10:30 AM
Not sure if the Hookshot or Lens bug is fixed yet, but try going to Quest->Misc_Data->Subscreens, then choose and open your default subscreen, click New, click Current Item, place it down were the Hookshot is supposed to be, right click the other equipable items that are currently equipable and click properties, then observe the position number. Now, open the properties of the Item you just placed down set position to the highest position number you found, plus 1, set itemclass to Hookshot, and change the up, down, left and right selects to a position associated with the item you want the selector to go to when you press in that direction, and repeat for the Lens, except set itemclass to Lens instead of Hookshot. Hope this helps.


Currently no topics are associated with this item.

