Jump to content

Photo
* * * * * 3 votes

[Comprehensive/2.50] Beginner's Subscreen Tutorial


  • Please log in to reply
9 replies to this topic

#1 Binx

Binx

    Formerly Lineas

  • Members
  • Real Name:Brian
  • Location:Lancaster, CA

Posted 26 March 2015 - 12:45 AM

Well, the subscreen tutorial already on the site is pretty good, but I've realized some people aren't as good at just reading text tutorials, and pictures could help, plus there are elements that were left out of that tutorial, so I've decided to write another tutorial that covers these elements a bit more in-depth, starting from a completely blank subscreen. This isn't going to be a guide on how to make a gorgeous subscreen, with advanced tilesets, it's just going to be a basic subscreen in the classic set, to give people an idea of how to use the editor.

Table of Contents:
1. Glossary of Editor Functions
   1.1 Elements
   1.2 Subscreen Types
   1.3 Element Manipulation
   1.4 Subscreen Elements
   1.5 Non-Functional Subscreen Elements
2. Planning
3. The Active Subscreen
4. The Passive Subscreen
5. Tips & Tricks


Edited by Binx, 26 March 2015 - 03:42 PM.


#2 Binx

Binx

    Formerly Lineas

  • Members
  • Real Name:Brian
  • Location:Lancaster, CA

Posted 26 March 2015 - 01:04 AM

1. Glossary of Editor Functions
Let's start with the basics, shall we? Most of this is covered in the ZC Wiki article on the Subscreen Editor, so if you've read that, feel free to skip this section.
1.1 Elements
First off, I'm going to be talking a lot about elements, so what exactly IS an element? An element is the basic building blocks of the subscreen, covering everything from the background of the subscreen, to frames, to text boxes, to heart containers, etc. Basically, everything is an element.One thing all elements share is a location tab, but you'll probably never need to use it, since it's usually far easier to manipulate elements visually.
1.2 Subscreen Types
There are two types of subscreens, active and passive.
The 
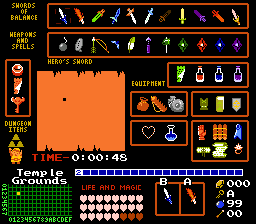
Active Subscreen is the subscreen that appears when you pause the game, this is where you'll keep all your inventory and quest items, as well as the dungeon map.
The 
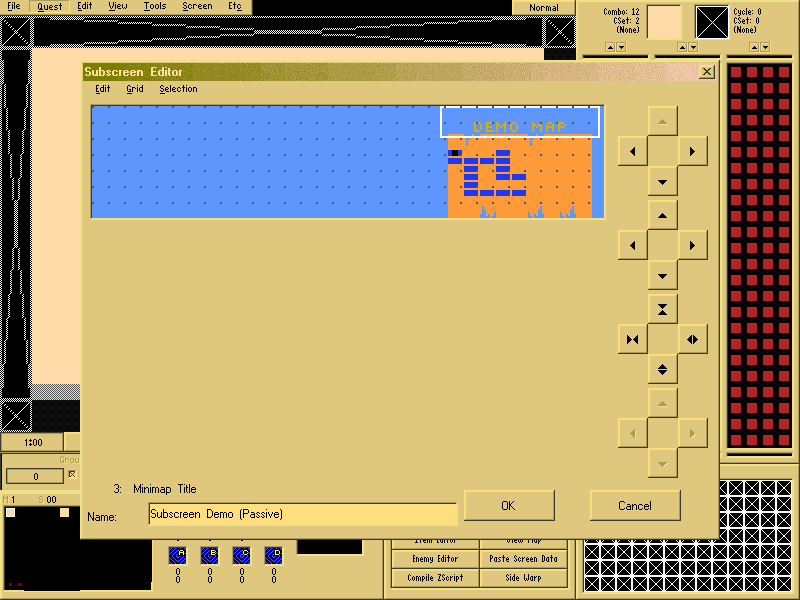
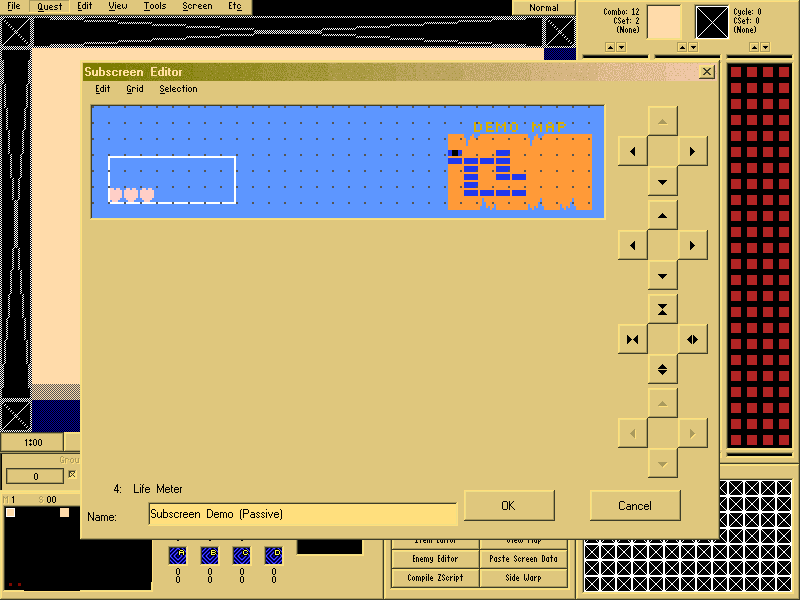
Passive Subscreen is the subscreen that is always visible during gameplay, where you generally will keep track of life, magic, counters, currently selected items and the minimap
However, since both are comprised of the same elements, technically, you don't actually have to follow these as rules, the only definite is which is active and which is passive. Want to keep track of Heart Container pieces of the passive subscreen instead of the active? Go right ahead, nothing's stopping you!
Templates are also available when you create a new subscreen, allowing you to build off of many pre-made subscreens, including every one that was available before the subscreen editor was implemented. However, I personally wouldn't recommend using them, unless you have a good firm understanding of how subscreens work, since templates are easy to mess up.
1.3 Element Manipulation
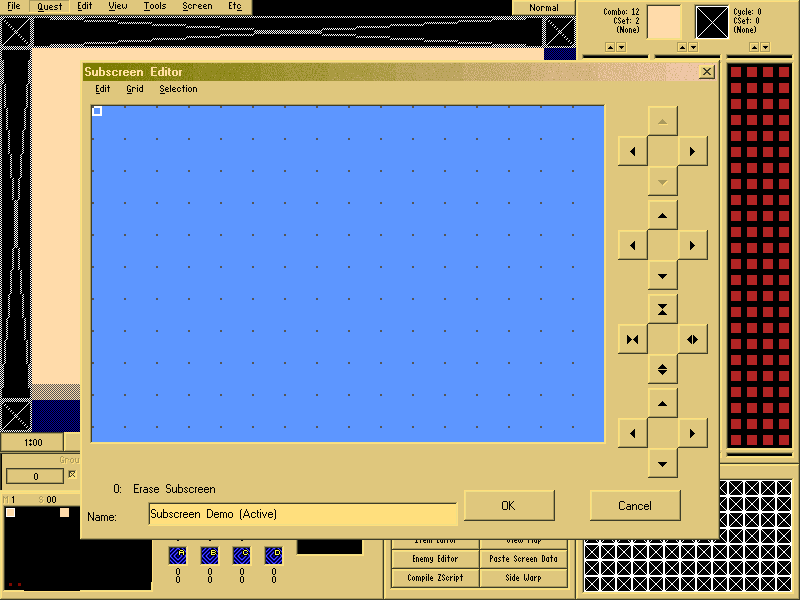
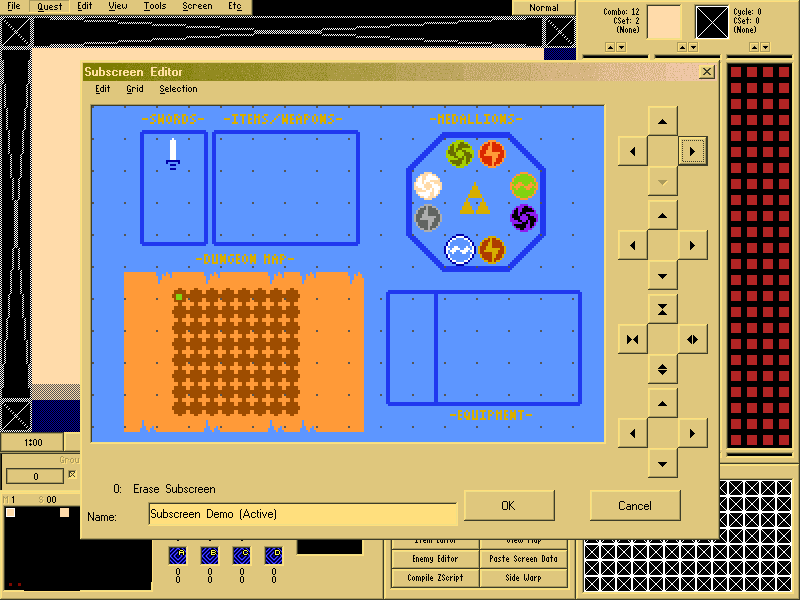
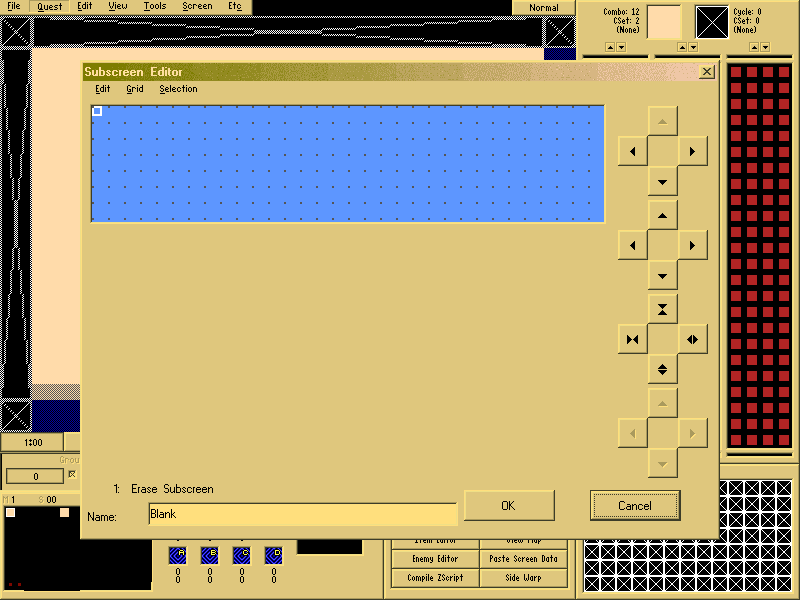
In this section, we'll be covering the basics on how to manipulate various elements, so, let's start by opening a blank subscreen, you go to "Quest->Misc Data->Subscreens", and this box will come up
zelda459.png
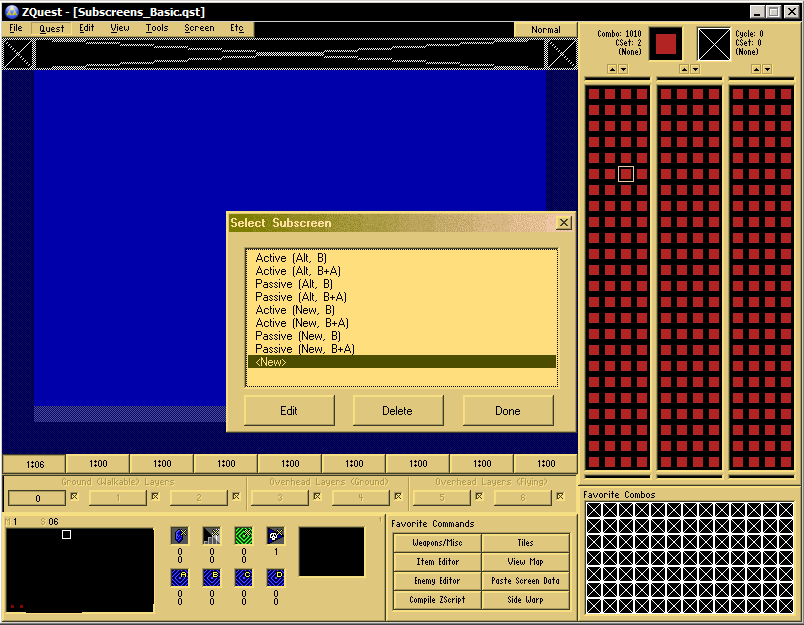
Select "<new>", and you'll see this
zelda460.png
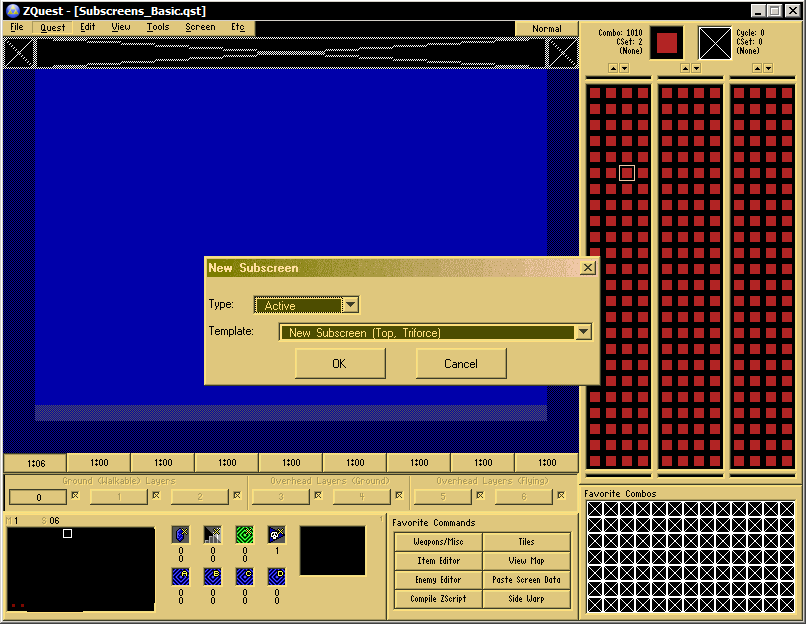
You can choose from active or passive, here as well as choosing your template. Let's start with an active subscreen with a blank template.
zelda461.png
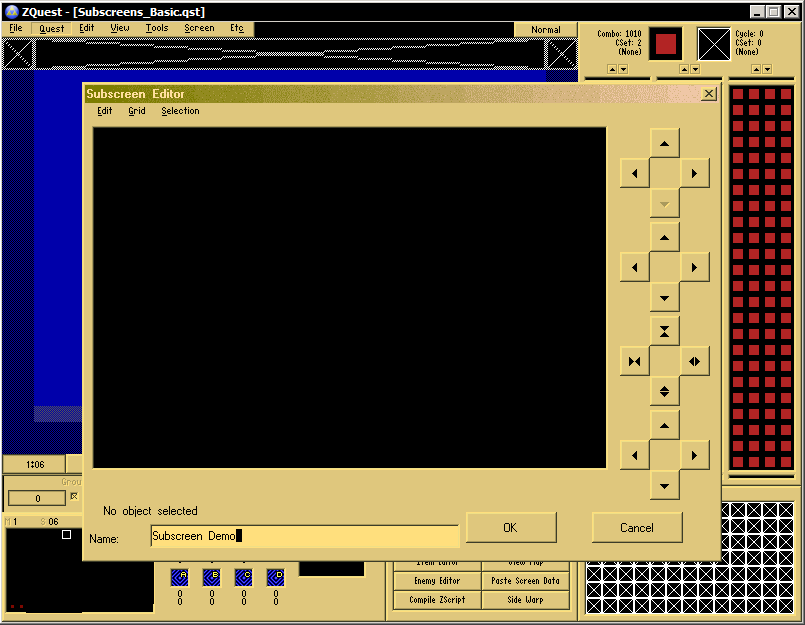
Ok, now we're ready to start.
First up is the mouse, simple enough, left-click selects an element, if you hold shift while left clicking, you can select multiple elements. while right-clicking will simultaneously select an element, then open a drop-down menu, allowing you to check the Properties of the element (which I'll get more in depth about when I discuss how to set up specific elements), or Inspect, which shows you all of the raw data associated with the element.
Now, the Grid. Which is basically exactly what it sounds like, it's a very basic grid system that utilizes dots to keep elements organized. You can view the grid by clicking "Show" under the "Grid" menu, and adjust the size of the grid by going to "Edit"
Next, let's talk about buttons, which are those 4 groupings of arrow buttons on the right side of your editor, each has a specific function.
The top set deal with element values, which are numbers associated with each element to tell the subscreen how to layer the items (for example, if element 1 and element 2 are overlapping, 2 will always be on top of 1). Up and down increase or increase the value of the currently selected item, while left switches the selection to a lower valued element, and right switches to a higher valued element.
The second set moves the currently selected element by one pixel in the direction of the button you click.
The third set expands and contracts the element size. This is mainly used for frames and boxes. Up makes it smaller, vertically, while down makes it larger vertically. Left and right do the same, horizontally.
The bottom set mimics the effect of using directional keys, in-game. These are crucial for testing your subscreen to make sure your items are all properly laid out.
Finally, we have the Hotkeys:
The directional keys work like the second set of buttons, they nudge an item by 1 pixel in the direction you press. While holding shift, it will move the item one grid space in whichever direction, while holding ctrl, it will work like the third set of buttons, expanding or contracting the element, and if you hold both shift and ctrl, it will expand and contract by grid markers, rather than by pixel. Insert will open the "new element" dialog box. Delete will, of course, delete. Shift+D will make an exact duplicate of the currently selected item. Z takes a snapshot (however, it can't do so when any dialog boxes are open). I have no idea what .zss files are supposed to be used for, so, I just don't use the X key, which opens a save subscreen dialog box.
1.4 Subscreen Elements
I was going to rewrite this part, but honestly, the wiki says it much more clearly than I can, and I'm relatively certain it's up to date, as far as which elements are functional, so, I'm just going to quote that, here. I will be going into more detail about most of these through the course of this tutorial, so, this will just serve as a basic glossary.
NOTE: The basic tiles that are hardcoded into the map system can be changed by going to "Quest->Graphics->Map Styles"


From ZC Wiki:
(None) - The default element placed in a subscreen when created without using a template, it has no use in the subscreen. Prior to 2.50.1 RC 2, editing this object showed glitched properties tabs with attributes for every element. This object has been adjusted to no longer show any editable attributes.
2x2 Frame - The name refers to the amount of tiles and their layout used by the element. When assigning this element to use tiles, it will use the top-left tile in a 2x2 tile block, and "divide" them into 8x8 pixel blocks, with priority given to the bottom and right blocks. Expanding the element is done in 8x8 pixel steps regardless of the grid unit values, and when expanded beyond the complete 2x2 tile size, will replicate the "side" blocks (not the corner blocks) of the element.
BS Zelda Time - A text-based element that will display the total play time of a certain quest as hours:minutes (Unverified).
Button Item - This element shows what item will be used when either the "A" or "B" button is pressed. Editing attributes will allow you to determine which button the element represents. Depending on the quest rules, either simply selecting an item will assign it, or pressing the corresponding button will assign an item to either button.
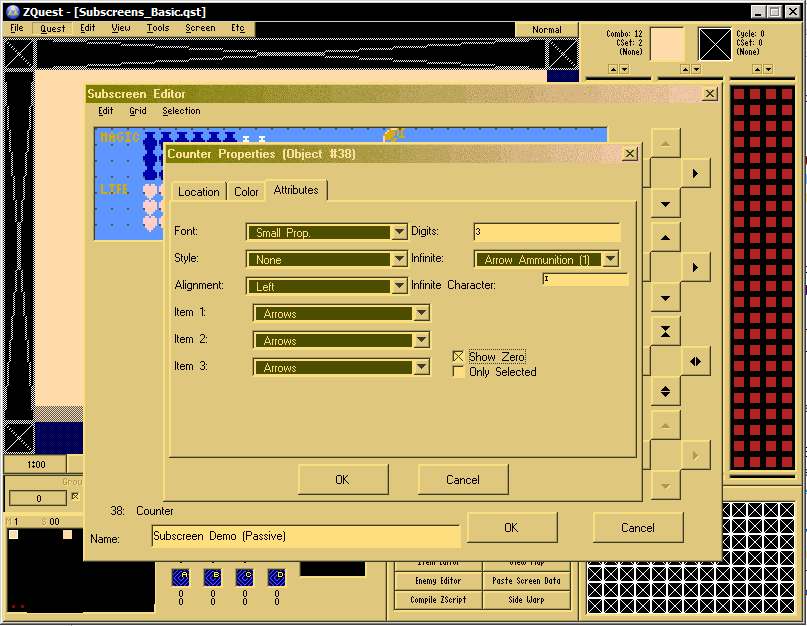
Counter - A text-based element. This element displays how many of a certain item (Rupees, keys, bombs, etc.) the player will have in their inventory. Attributes allow you to define which item the counter represents (Item 1), how many digits to permanently display on-screen (Digits. For example, imputing a value of 1 will display one zero when empty, while a value of 3 will display three zeroes when empty), which tile or character (Infinite Graphic/Character) to display when the player has an infinite supply, to show 'none in inventory' (Show Zero), and if the counter is even shown unless the player selects it in the subscreen (Only Selected). In the editor, the infinite character will always be displayed, however the size of the counter's maximum digits is shown when selected.
Counter Block - A text-based element, which is a preset group of counters which will display Rupees, Keys, Bombs, and Super Bombs in that order. This also comes preset with the default placement of the corresponding icons in the tile editor as Minitiles, and cannot be changed. Digits and Infinite Character do exactly the same as the Counter element. Use X will place an X between the icons and the counter text (As seen when playing the original Zelda).
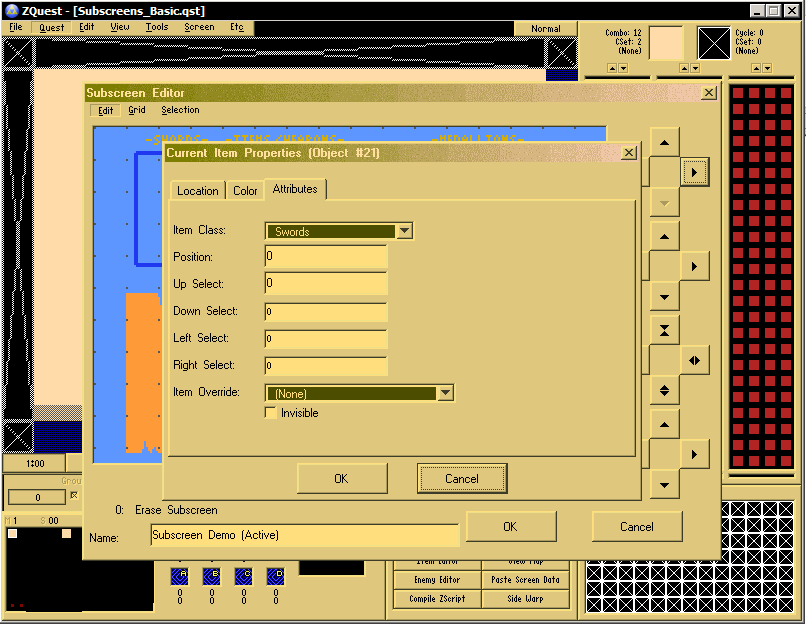
Current Item - The items, basically. The element's attributes will determine which item to display when it is added to the player's inventory, as well as it's "position". "Position" refers to whether or not the item is un-selectable (value of -1), and the item's selectable position. As well, attributes will determine which item position to select when pressing up, down, left, or right in the subscreen. It may help to think of the player's selectable inventory as a map, and position refers to the item's literal position on the map, as well as where to go next when a direction is pushed. Experimenting and using pre-made subscreens is really the best way to understand this.
It is possible to pick up an item in-game and add the item to the player's inventory without having a 'Current Item' object for that item in any subscreen.
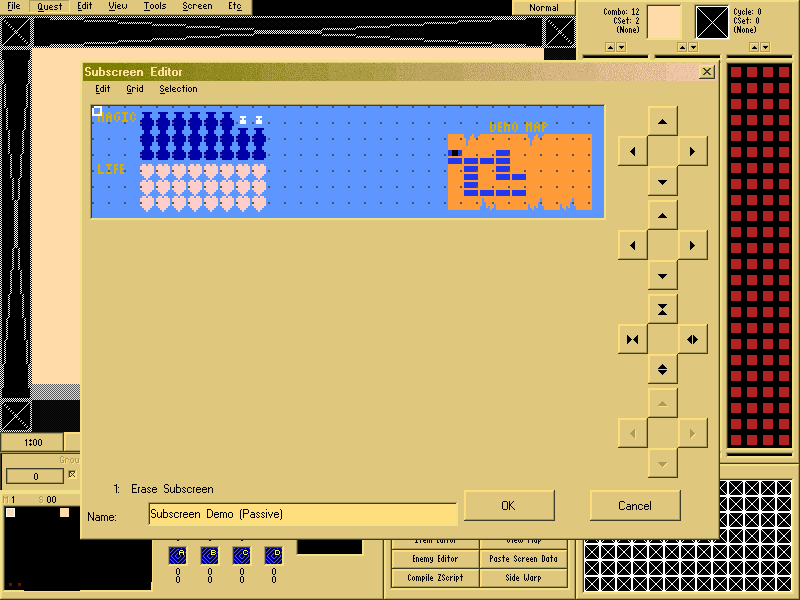
Erase Subscreen - Unsure of actual purpose, however this element is found on every pre-made passive subscreen, however it's presence does not seem to be critical (subscreen behaves as normal). What it does do, however, is instantly fills the background of either and active or passive subscreen with the selected color.
Game Time - A text-based element which displays the cumulative questing time of the player in the format of hours:minutes:seconds.
Game Time (Quest Rule) - Same as above. Unsure if there is a difference beyond displaying beyond the status of the Quest Rule Show Time On Subscreen.
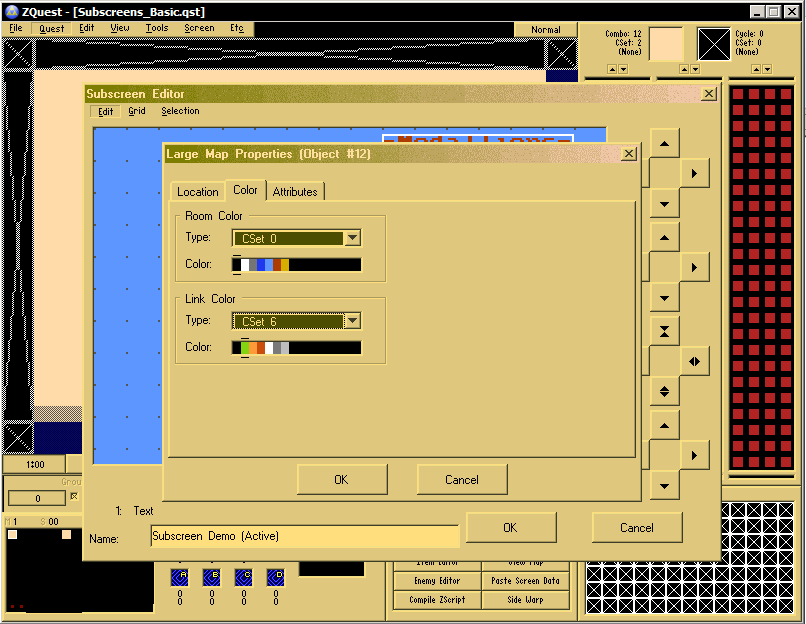
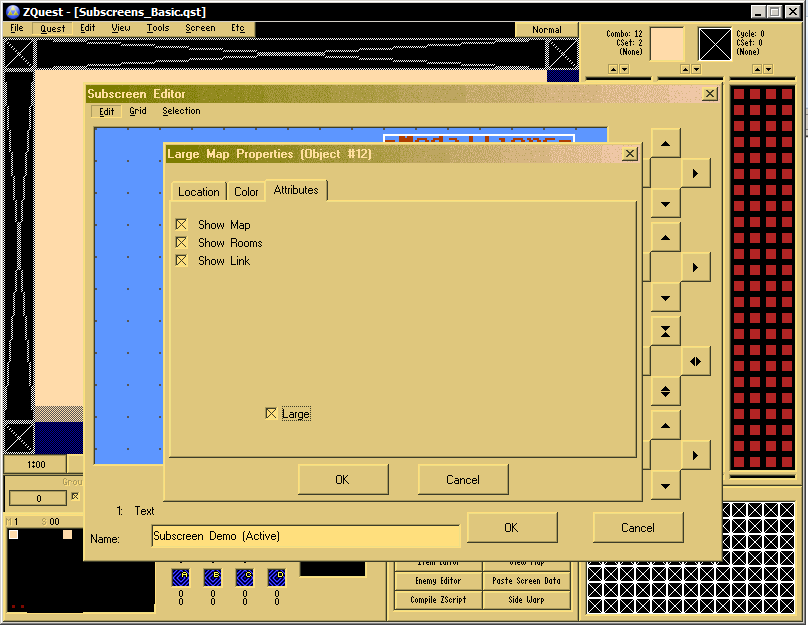
Large Map - Displays (when selected in Attributes) a map, the position of the player, and the rooms they have currently visited. The graphic displayed is based on the Dungeon Map graphic chosen in the Map Styles screen. Rooms are shown as 6x6 pixel blocks with 1x2 or 2x1 pixel blocks to show passages between rooms, following an 8x8 room grid (which corresponds to the size of a Dungeon-type DMap). Player location is displayed as a 3x3 pixel dot placed on top of the room they are currently in. The Large option increases the size of the map graphic and repositions the rooms to center it. This element is intended for Active subscreens, and will not fit on a Passive subscreen.
Life Gauge Piece - A single part of the player's life gauge, also known as "one heart", and arguably one of the most complicated elements in a subscreen. A detailed explanation of how this element works can be found on the guide to Life Gauge Pieces.
Life Meter - A pre-made life gauge, for those who don't need to customize their meter's appearance too much. Attributes determine how many rows of hearts to display (One row is eight hearts, meaning a maximum of 16 or 24 hearts), and how they drain. BS-Zelda Style forces the hearts to drain from the bottom and the right, while regular forces the hearts to drain from the top and the right.
Both Life Guage Piece and Life Meter elements restrict how many Heart Containers Link can collect-- there cannot be any more than what is placed on the subscreen. Currently, it is unknown how Zelda Classic will handle a 'missing' heart container (ex: subscreen has containers 1, 2, 3, and 5, but not 4). Assume bad things, and make sure they are all there.
Line - Draws a single-pixel thick line. Expanding the line will stretch it in either direction, and by expanding it both vertically and horizontally will draw the line at a slant. The slant is restricted to the top-left to the bottom-right of the area, and cannot be flipped, unfortunately.
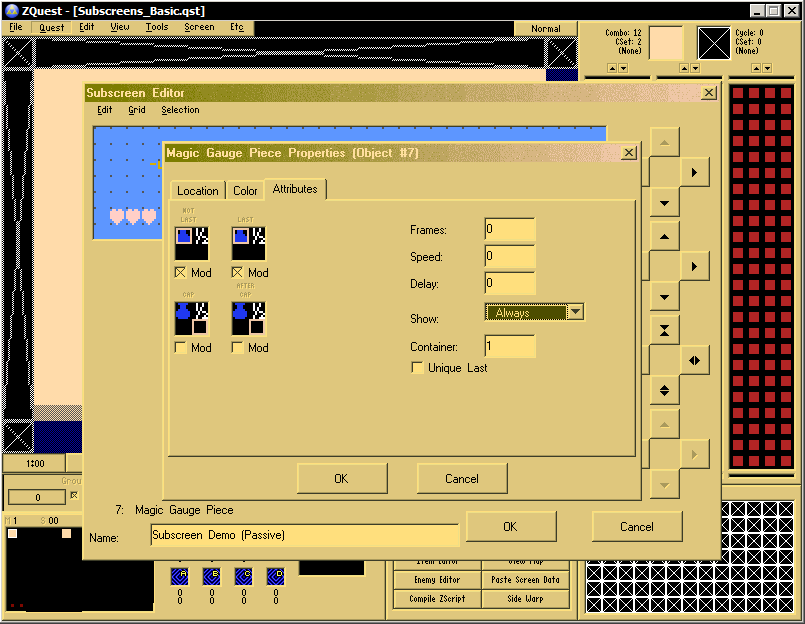
Magic Gauge Piece - A single part of the player's magic gauge, and like the Life Gauge Piece, is fairly complex. Likewise, more details can be found on the guide to Magic Gauge Pieces.
Magic Meter - Like the Life Meter, it is a pre-made magic gauge for those who don't want to go through the trouble of setting one up. It uses the Misc: Magic Meter sprite and tile layout, however currently, it is undetermined how to set it up, exactly, as there are no attributes to edit.
Minimap - A smaller version of the Large Map element. It allows the same customization, but does not lack a Large option, and replaces Show Rooms with Show Compass. Intended for Passive subscreen use, it's rooms are shown entirely once the player collects the Map item, but does not show passages between them. Each room is layed out on the same 8x8 room grid, but each room is now 7x3 pixels in size.
Minimap Title - A text-based element which changes the content of the text depending on the name of the DMap the player is currently in.
Minitile - This element breaks down a normal-sized tile into four, 8x8 pixel segments (each of which can be selected by right-clicking on it), and displays only that section. The purpose of the Special Tile attribute is yet unknown, however experimentation shows no change in the tile displayed on the subscreen. Possibly, it is used simply as convenience to get to certain tiles, as the two options SS Vine and Magic Meter have matching Weapon/Misc. sprites.
Rectangle - Exactly what it promises. Expanding this element will draw a rectangle, which can be outlined and filled determined by it's attributes.
Selected Item Name - A text-based element which changes what it reads to match the name of the item currently highlighted by the Selector 1 / 2 elements.
Selector 1 / 2 - Both of these elements are exactly alike, except for that they can both have different appearances. Each appearance is determined by the Item graphic selected, and by selecting the Large option, it will double the size of the graphic displayed.
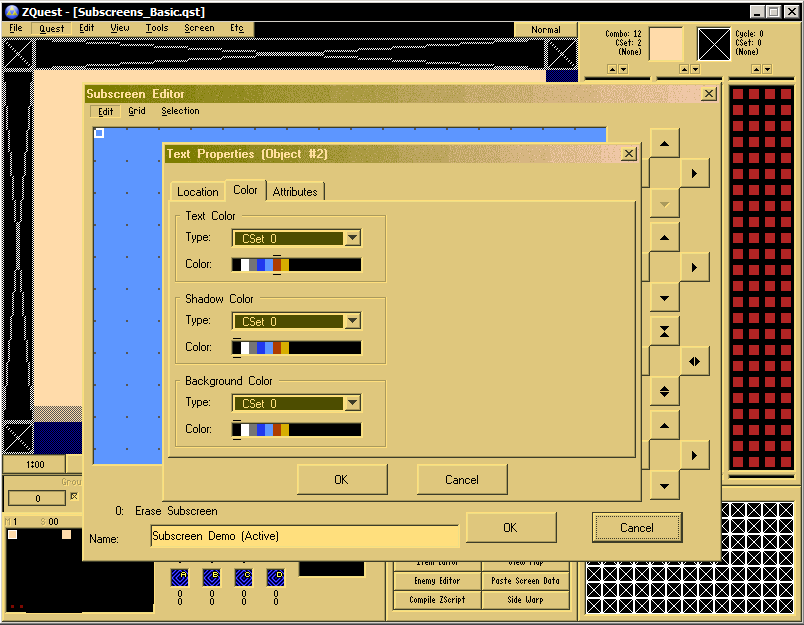
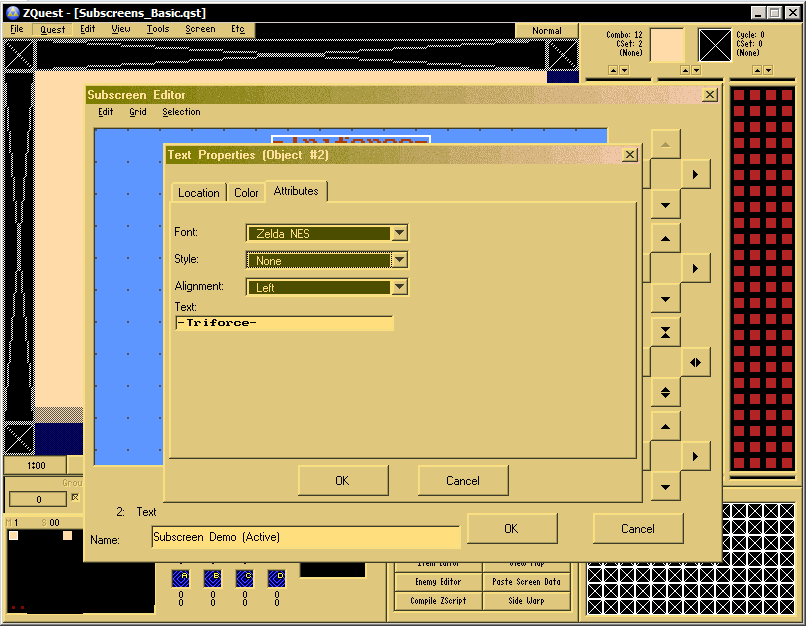
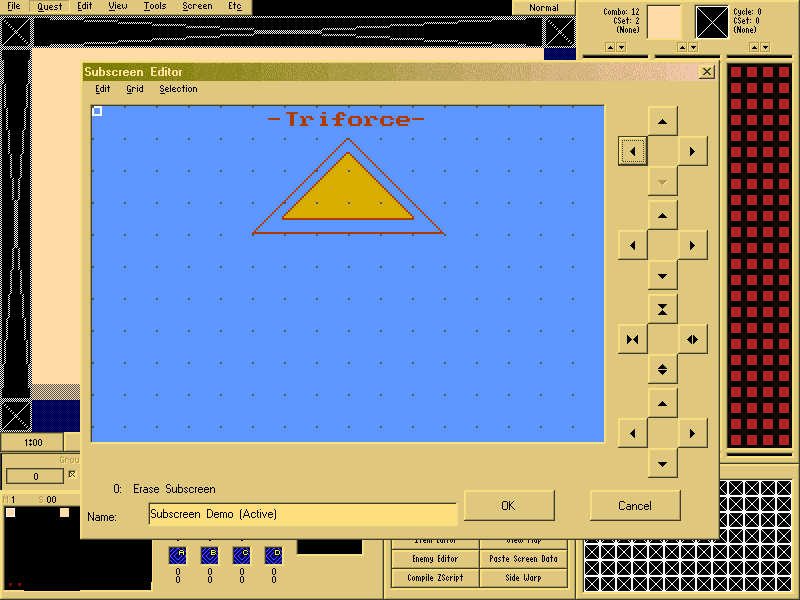
Text - The basic block of text. Size is determined by the font, and how many characters are in it.
Text Box - Similar to the Text element, the primary difference is that you can determine the size of the box (and therefore, how much of the text is displayed). As well, wrapping can be customized by the attributes tab.
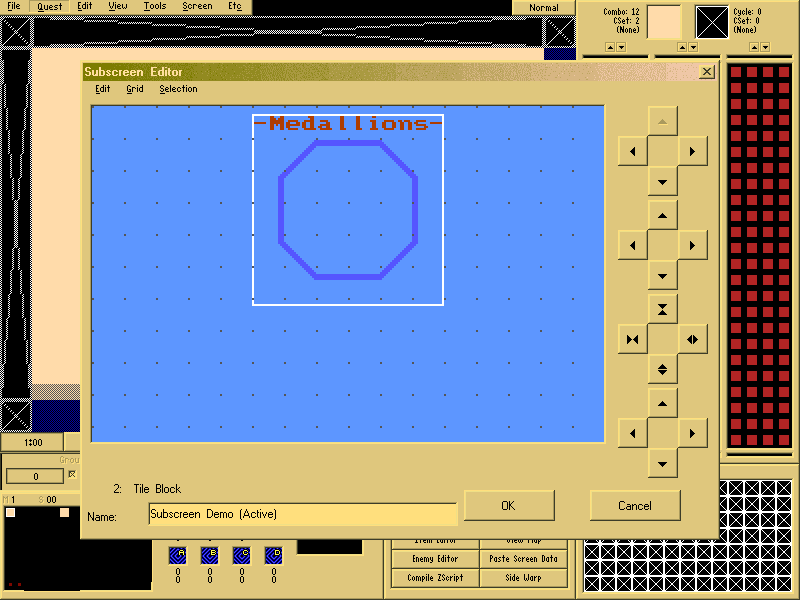
Tile Block - This element is purely intended to be used for aesthetics. Selecting a tile under the attribute tab will set it to use that tile as a starting spot. Expanding the element is done 16x16 pixels at a time, regardless of grid size, and will display the tiles next to the starting tile, and under the starting tile. It may help to think of expanding the box as revealing more and more of an image.
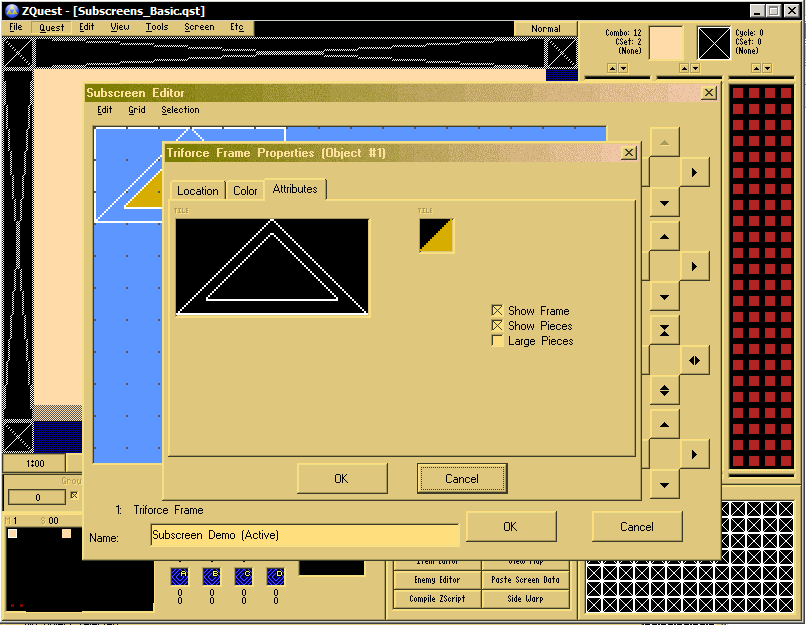
Triforce Frame - A pre-made element that utilizes both Tile Blocks and Triforce Pieces, and automatically positions and sizes them as per the original Zelda. Attributes allows you to select the graphic for the frame, the graphic for the Triforce pieces (flipped horizontally and vertically), and whether or not to use a larger frame. A larger frame means the frame itself will be four rows of tiles taller, and one wider, while the triforce pieces will be three rows tall and two rows wide, and repositioned accordingly.
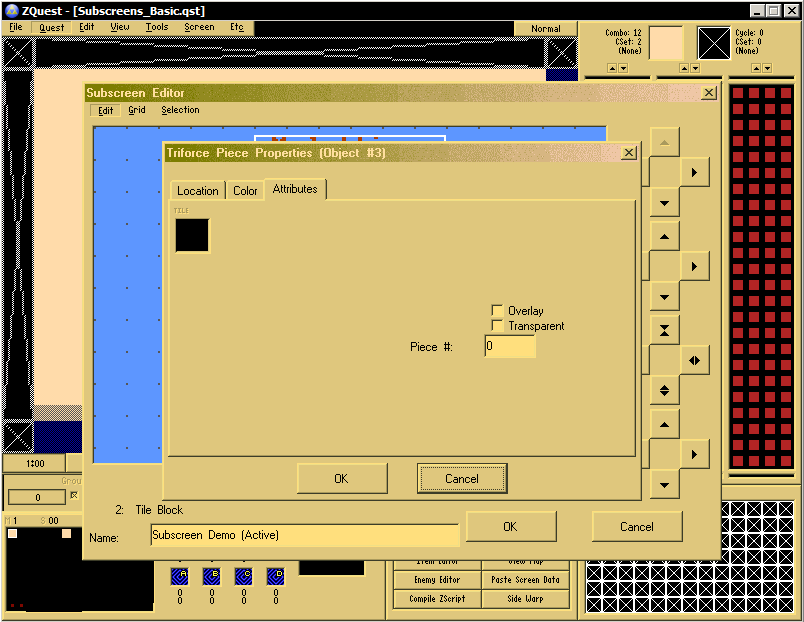
Triforce Piece - Determines where each piece of the Triforce will be placed on the subscreen upon collection. Each piece can have it's own unique graphic, and multiple Triforce pieces can share the same value, allowing for the appearance of larger pieces.
Regardless of how many pieces the player may collect in-game, and the value of the elements on the subscreen, only eight will be displayed. Only four will be displayed when the quest rule "Big Triforce Pieces" is checked. Only six will be displayed when the quest rule "3 or 6 Triforce Total" is checked. Only three will be displayed when both of these quest rules are checked.

1.5 Non-Functional Subscreen Elements


From ZC Wiki:
Current Item -> Text - Possibly going to be displayed somehow based on Current Item status in-game.
Current Item -> Tile - Same as above.
Current Item Class -> Text - Unsure of intended use.
Current Item Class Name - Possibly similar to Selected Item Name , but displayed somehow based on Current Item status in-game.
Current Item Name - Same as above.
Icon - Possibly going to display the current Game Icon.
Item - Unsure of intended use.
Selected Item -> Tile - Possibly changes appearance depending on which, or if a certain item is selected in the subscreen.
Selected Item Class Name - Possibly displays the class name of a selected item, similar to Selected Item Name.


Edited by Binx, 26 March 2015 - 03:39 PM.

  • ShadowTiger likes this

#3 Binx

Binx

    Formerly Lineas

  • Members
  • Real Name:Brian
  • Location:Lancaster, CA

Posted 26 March 2015 - 02:22 PM

2. Planning
Now, for me personally, the building of the subscreen begins before I ever touch the editor. The first thing to do is determine which elements you are going to use for your subscreen. How many Heart Containers are you going to use? How many Magic Containers? How many button items will you have? How many equipment items will you have? Are you going to keep the map and triforce frame on the same active subscreen, or take the Z1 approach and have two subscreens, one for the dungeons and one for the overworld? Are you going to even use a subscreen map? For the purposes of this tutorial, we're going to stick with a single Active subscreen, with 24 Heart Containers and 16 Magic containers, so let's discuss items, shall we? The first question you have to ask yourself is, "is this item necessary?". I know the default subscreens proudly display all of the items, and it can be really tempting to use all of them, but many of the items are fairly redundant in their use, and it's easy to overcrowd your subscreen with too much junk. I think 12 button and 12 Equipment items should be more than enough, for the purposes of learning design. Now comes the question of whether or not you're going to have the a-button item be selectable. Since I want to give the most in-depth review possible, yeah, let's go ahead and do it! So, for my 12 button weapon classes (not including the sword, I'll get to that), I'm going to pick: Boomerangs, Bombs, Super Bombs, Din's Fire, Bow/Arrows, Wands/Books, Bait, Roc Items, Hammers, Hookshots, Whistles and Potions. That leaves equipment items, so I'm going to use the Flippers, Rings, Bracelets, Shields, Bomb Bags, Quivers, Wallets, Spin Attack Scroll, Quake Hammer Scroll, Wealth Medals, Heart Container Pieces, and Magic Container Pieces (a very simple item drop replacement script, that I will include, here):
Magic Container Pieces Script and Setup


Now, you're going to want to come up with some kind of vague mental layout of how you want your subscreen to be set up, so that you don't have to do extra work, later on.

So, now we've gotten that all picked out, let's move on to our Active Subscreen

Edited by Binx, 26 March 2015 - 03:40 PM.


#4 Binx

Binx

    Formerly Lineas

  • Members
  • Real Name:Brian
  • Location:Lancaster, CA

Posted 26 March 2015 - 02:54 PM

3. The Active Subscreen
Now that we have our plan in place, and our blank active subscreen opened up, we can finally get down to brass tacks and build our first subscreen.

The first step is to make a new element and choose "Rectangle", click on the "Color" tab and pick whatever color you'd like to be the subscreen background color for the outline and fill, then under the "Attributes" tab, click "Filled". For the purposes of this tutorial, I'm gonna go with the light blue, because it will make it easier to illustrate some points later on

zelda462.png

Then click "ok", your subscreen should now be the color you chose

zelda496.png

Ok, now we have our subscreen background. If you don't add a background to your subscreen (though it can also be done with "erase subscreen", but it seems a bit buggy, so I just use a rectangle, instead), when you activate it, the subscreen will be see through, and it will look bad. It's time to move on to layout. The grid is very handy, here, since it makes it much easier to organize the subscreen. Personally, I like to start with my Triforce Frame. So, you make a new element, select "Triforce Frame", and select your tiles for the frame and pieces under the "Attributes" tab

zelda464.png

Then reposition it to wherever you want to put it

zelda465.png

Now, you probably want to put a label on it, now, right? So, you make a new element "Text" and it will open up the properties box.
 

From ZC Wiki:


When an element has text in it, the options below will always be available for it.
Text, Shadow, and Background Color: Under the Color tab, each color used by the text can be set.
Font: Choose from a variety of different fonts to use, however be wary at the size of some of them when designing your subscreen.
Style: Select how the text is displayed.
None: No shadow.
Shadow: Produces the effect of the shadow without overlaying text.
Shadowed: Same as Shadow, however the text is overlaid as well.
(U): Shadow is "thicker" directly below the text.
(O): Shadow is displayed around the entire text.
(+): Same as (O), however the shadow appears thinner.
(X): Similar to (O), however certain parts of the shadow are removed around the text. The idea here is to have a background color halfway between the Text color and Shadow color, giving the text a "smoother" appearance.


zelda466.png

zelda467.png

zelda468.png

But wait, what if you don't want to use the normal Triforce frame, and you want to use custom Triforce items? Well, it's pretty simple, really. Instead of selecting the "Triforce Frame" element, you select a "Tile block" and make a custom frame, like so:

zelda469.png

Now's as good a time as any to discuss the "Overlay" and "Transparent" check boxes, as we'll use them often. Transparent does just what it says, it makes the element semi-see through, while "overlay" makes the first color in the CSet of the element invisible. If the overlay box is not checked, for example, there'd be a big black box around that frame.

Next thing you do is add your "Triforce Pieces", these are a bit more involved, when you bring up the properties box for your new "Triforce Piece" element, you'll see this:

zelda470.png

So, you click the overlay box, choose your tile and CSet, then assign the number to the piece. Multiple pieces can have the same number, allowing for larger pieces, but only pieces 1-8 will show up on the subscreen. There are ways around this with custom items and scripting, but in most cases, 8 is a perfectly workable number.

zelda471.png


So, now repeat that process for pieces 2-8

zelda472.png

The triforce there is just a tile block. I have, however, put actual "triforce" items in the game, in the past, but getting them to work right requires scripting, and a lot of setup (It's essentially a modified version of the magic container piece script, with the full triforce being an item bundle containing three "goddess items", but it's a bit more complicated than that)so we're not going to cover that, here. But normally, you wouldn't put an tile block that serves no purpose, so, for this subscreen, just pretend that that block is an actual item.

Next up is the map, if you're going to do separate subscreens, your map is generally going to go in the same spot as the triforce frame, otherwise, you gotta make sure you have space for both, so I moved the frame to the right, and opened up a "Large Map" element.

zelda473.png

Under the "Colors" tab, you have the options to pick your room colors, and the color of the Link marker. Personally, I'm gonna go for a slightly darker shade of brown than the paper, so it will look more like a map

zelda474.png

And under the "Attributes" tab, you can chose what will be shown on the map and the size. With the "Large" option unchecked, the map is roughly the size of the medallion frame in the example above. If you're using freeform dungeons, I'd recommend turning off the "rooms" option, in favor of custom maps tied to the DMap.

zelda475.png

Ok, almost done, Now for button items and equipment. We'll do button items first.

The easiest way to do this is with a 2x2 frame, so we'll make a couple of those. The first thing you'll notice is it's just like setting up a tile block, so set up your frames however you'd like them to be.

zelda476.png

Add some more text

zelda477.png

And now we can start adding the items. For the most part, these will all be pretty much the same, the exceptions I'll cover. First thing you do is marke a new element of the "Selector 1" (or 2, it doesn't really matter, as they do the same thing.) It basically needs no setup,as it automatically goes over your items.

Next, make a new element of the "Current item" type

zelda478.png

Ok, this is probably the second easiest part to screw up when making a subscreen (the first being the life/magic gauge pieces). "Position" refers to the number of selectable items on your subscreen, and its place on the list, so, for our example, we're going to have 15 possible items, so we'll use positions 0-14, a position of -1 means an item is unselectable. the next four boxes are which position it will move to if you press up, down, left, and right, respectively. The checkbox at the bottom that says "invisible" does just that, it makes the item invisible. The final box is why we're doing swords first. Let's say you want to be able to choose between multiple versions of the same item class, like choosing your arrows or sword, this is how you do it. You simply set the item override box at the bottom to whichever item you want to set there, like so:

zelda479.png

zelda480.png


Now you just repeat this process for the rest of your items. Now, technically, the Bow is an equipment item that allows you to fire arrows, so the position on that one is set to -1, while the arrow is the one that actually is selectable. The same concept with the book, although some prefer to put the book in the equipment area.


zelda481.png

Test them out to make sure they all work, correctly. That white box there is for the selected item names, it will only show up in-game. Now do the same for equipment, set them all to the position of -1.

zelda482.png

Wonderful! Now we have a fully functional active subscreen. Are you ready to move on to the passive screen?

Edited by Binx, 26 March 2015 - 03:38 PM.


#5 Binx

Binx

    Formerly Lineas

  • Members
  • Real Name:Brian
  • Location:Lancaster, CA

Posted 26 March 2015 - 03:15 PM

4. The Passive Subscreen

So, now we're going to open a new subscreen, but this time,we're going to select a "passive" screen with the blank template, and again, we're going to add a "rectangle" element. Then, I'm going to go to the Grid menu, and shrink it downto an 8x8 unit, since we'll be working mostly with minitiles.

zelda483.png

Now, as with an active subscreen, you should have some kind of plan of where you want to go with this. So, we'll start with the minimap. Functionally it's no different than the "Large Map" element, except it lacks the "large" function, and replaces "show rooms" with "Show Compass", also replacing "room color" with colors for the compass blinking and not blinking, then another new element "Minimap Title" which will automatically show the title of the DMap you're on:

zelda484.png

Again, with the map overrides under Dmap, you can make incredibly detailed custom maps, if you wish to, and I highly recommend you do so, if you're making freeform dungeons.

Ok, now that we have our map, let's place our Life and magic meters.
For the first part, the life gauge, there are two options, you can place individual pieces, or place a pre-made meter with all of the hearts pre-placed. In most cases the meter is fine (the only real problem with it is that it's restricted to either 16 or 24 hearts), and since the individual life gauge pieces act exactly like the magic gauge pieces(and the pre-made magic meter... It works, but only barely, it can't have a maximum capand it only gos out in a straight line, and ithas no attributes to edit, so we'lljust stick with the individual pieces.), we'll just use a meter, and I'll go into the explanation on life/magic gauge pieces when in the next step. So, make a new element of the "Life Meter" type, and select if you want two rows (16 hearts maximum) or 3 rows (24 hearts maximum). Choosing "BS-Style" forces the hearts to drain from the bottom right, rather than the top right :

zelda485.png

So, now we get into Life and Magic gauge pieces. Like I said, as far as setup goes, they're nearly identical.

zelda486.png

The first three boxes on the right are for animated frames, if you want your hearts to pulse, or something, while the box on the bottom-right determines which container number it is (numbered from 1-whatever) the four boxes on the right allow you to use multiple minitiles. You right-click a corner to use that corner for your minitile. The first box (Labelled "Not Last", going clockwise, starting from the top left) is for most of your hearts/magic containers, while the second ("last") uses the minitile for the last heart/magic container you can get, if, for example, you wanted to use a different (maybe slightly larger, for example) tile for that one. The third (after cap) covers most of the HC/MCs you haven't gotten yet, and the fourth (cap) is the last collected container when you haven't gotten them all. The little "1/2" minitile is used for when you have the double magic power-up. The "Show" dropbox tell the quest which level of precision to use when displaying hearts, and the "unique last" checkbox tells the quest if it should use the "last" tile, or if all the containers should use the same tile. Then you just duplicate it until you've gotten your meter lined up,but remember to change the container number every time, or the game won't know what to do.

zelda488.png

Next thing to add is our button items, so we add a couple frames and labels, then add two "Button Item" elements in the center of the frames. There's only one dropdown menu,setting whichever button is assigned to that item; it's pretty self-explanatory:

zelda490.png

And now for our counters. You can do them manually with the "Counter" and "minitile" elements, or you can also use the "Counter Block" element, which combines several counters with preset minitiles. The options are pretty simple, number of digits, "Infinite" character, and color, as well as basic text options. Since the Counter Block only covers rupees, keys, bombs and super bombs, we'll also need some additional counters, namely one for arrows. So, we make a counter, And we see this wonderful scene:

zelda489.png

Actually, if you read the glossary above, it's pretty easy to understand, so you just set the values there, then add minitiles and:

zelda491.png

Now, it looks like we're just about done, here, only one thing left, Placing a game time counter, which is just another text-based element, then we just assign it to a DMap, and test it out.

zelda492.png

And there you go! A fully working subscreen. You'll probably notice that I changed little things as I went along. This is to be expected, many times you'll have to work to get one thing right, only for another to go bad, forcing you to shift gears. If I had the time to re-edit even more tiles to use the prettier map, I would, but this tutorial is more about function than form. I'll be discussing form a little bit in the next section.

Edited by Binx, 26 March 2015 - 03:36 PM.

  • V1ral likes this

#6 Binx

Binx

    Formerly Lineas

  • Members
  • Real Name:Brian
  • Location:Lancaster, CA

Posted 26 March 2015 - 03:36 PM

5. Tips & Tricks
"Negative Space"
Don't be afraid of blank space on your subscreen. Players need a place to rest their eyes, and negative space provides that for them. By trying to fill every last inch of your subscreen with stuff, you can make it overcrowded and busy, and unpleasant to look at. That's one reason I said to plan out the items you're going to have, first, rather than just saying "Use them all!"

"Item Slots"
A cool aesthetic trick you can use is "Item Slots" where you make a faded-out tile of a given item and place it under your item on the subscreen, so if that item isn't there, you still have a "placeholder" reminding you it's there. There are two ways you can do this. The first, and simplest, is to simply use tile blocks. The drawback to this method is that the tiles are always there, so the players will know what items to expect right from the start. The second method is the one I use. In this method, you assign all those faded-out tiles to custom items, labelled as "dummies" (the best method is to use just 1 class, and use item overrides to place them, just like the swords, in the tutorial example above), that have no use and place them on the subscreen as "current item" elements with a position of -1, underneath the actual item tile. Then, you attach a simple item bundle pickup script to each real item, with the dummy item attached, something like:


//D0 : Set this to the dummy item you want to give in the bundle and place as the pickup script on one item.

item script MultipleItemPickup
{
void run(int Item0)
   {
    item giveitem0= Screen->CreateItem(Item0);
    giveitem0->X = Link->X;
    giveitem0->Y = Link->Y;
    giveitem0->Z = Link->Z;
    }
}

Or this

//D0 : Set this to the dummy item you want to give in the bundle and place as the pickup script on one item.

item script DummyItemPickup
{
void run(int ItemID)
   {
    Link->Item[ItemID] = true;
    }
}

This is a simple (if messy) way to keep track of items if you make a mutiple inventory system (mine is a bit complicated, and i've seen nicer, cleaner ones around), and is how I made character switching on the fly work in my current quest, and gave them each their own individual inventories, but mainly, it's good for adding those "disabled item" tiles to the quest only after you pickup the actual item.

"Custom Maps"
I brought this up a couple times in the main tutorial, but in the DMap editor, there is a tab labelled "Maps" and if you click it, it looks like this:

zelda497.png

These maps override what is set in the "Map Styles" menu for the minimap and large map on the subscreen (so you don't have to make multiple subscreens to do this, that would be a nightmare). What you do, is you open up the full map of the area (View->View Map, click whatever size and check "Save to file (Mapmaker)") Then, you just open up the .png image in your favorite image editor and resize the map to fit within the constraints of the maps and how Link's marker moves on them, once they are the proper size (80 pixels x 48 pixels for the minimap, including a border around the map, 8 pixels on the left and bottom, and 7 pixels on the right and top. The large map is 144 pixels x 80 pixels, with the same kind of border, except it's 8 pixels on all sides), you import them back in to your tileset, and you'll probably have to recolor the map heavily, to make it look right (unless you use GraphicsGale as your go-to .png editor, which I highly recommend), but that's all there is to it. After that, you go to that "Map" tab in the Dmap editor and set your "blank " maps on the "without map" tab and your resized, recolored versions of the actual map on the "with map" tab. Now, when you get the dungeon map, it'll show a more detailed image of the dungeon (rather than just blue blocks). This is especially good for freeform dungeons, because those don't generally fit too well in the boxy style of the base maps. NOTE: This only works with "NES Dungeon" DMaps, on all other DMaps, you have to just have the resized map as the image on the "without map" tab.


ADDITIONAL NOTE: The "Rooms" on the "Large Map" element comprise only an 8x8 square, half a full map.Don't use a full sized map, unless you're okay with Link's position being off center. This is really only a problem on overworlds, since NES Dungeon DMaps will restrict you to the 8X8 format for the map, anyways, but it is one to think about.

"Custom Triforce"
I know I covered this. Or did I? Did you know you don't have to have an item on your subscreen in order to have it in your quest? If you'll notice, two of the three subscreens below don't have any triforce pieces at all.That's because I used that item bundling script above to secretly add the triforce pieces under the guise of other items, Like the "Swords of Balance" in the second shot.


Play around with the editor, a bit, too, don't be afraid to experiment. There are no limits to what you can do with a little patience and ingenuity.

zelda492.pngzelda493.pngzelda520.pngzelda521.png

Is there anything I missed, anything you still don't understand? Please, post your thoughts here.


Edited by Binx, 07 April 2015 - 05:03 PM.


#7 LikeLike on fire

LikeLike on fire

    vaugly coherent

  • Members
  • Location:NJ

Posted 31 December 2016 - 07:34 AM

is there a video version?


  • ChrisHunter64 likes this

#8 Binx

Binx

    Formerly Lineas

  • Members
  • Real Name:Brian
  • Location:Lancaster, CA

Posted 19 April 2017 - 07:40 PM

is there a video version?

No. I don't have the necessary software to make a video tutorial.


  • ChrisHunter64 likes this

#9 ChrisHunter64

ChrisHunter64

    average everyday normal guy

  • Members

Posted 18 August 2019 - 01:02 AM

Wow i didnt even know you could make your own subscreen. I just figured everyone who had custom subscreens in other quests just used scripts but thats pretty amazing. Good on you for making an elaborate tutorial i will definately give this a try when i have a chance.

#10 Twilight Hero

Twilight Hero

    Heir to the Hero

  • Members

Posted 08 March 2021 - 01:23 PM

Thanks a lot! This really helped me make my own subscreen for the quest I'm making! :)


Edit: I do have a problem, though. I ran into a bit of hiccups when cycling through items. I'll be on one item, (in position 1) then try to cycle to another one one (in position 10 or 11), but I would only be able to reach it cycling one way, not the other.


Edited by Twilight Hero, 11 March 2021 - 11:49 AM.


0 user(s) are reading this topic

0 members, 0 guests, 0 anonymous users