GraphicsGale: What You Need to Know
An advanced tutorial by Ebola Zaire.
Note: this tutorial relies heavily on the ability of the reader to try things and comprehend information. This is a tricky process to learn, and even harder to explain. If you find yourself with results that don't match mine, you should carefully read the instructions again- chances are, you simply forgot or misread something. If you come to a point where it's not clear whether to do one thing or the other, try them both before asking questions. You learn as much from mistakes as you do from successes.
Just what the heck is this GraphicsGale?
GraphicsGale is software that is geared towards creating animated sprites. However, us ZQuest users can use it for a different purpose- palette editing. What I mean is that we can edit the palette on an image so that you can grab it into your .qst file with no recoloring. Cool beans, huh?
Yeah, cool beans. Where can I get it?
Here's the download page on the official website. You'll notice that there are two different versions available for download- a "Free" and "Shareware" version. The free version is exactly that- free. However, you lose the ability to save and load .gifs, which is probably the most common image type when dealing with sprites. You'll have to convert .gifs to 256-color .bmps using paint or another program before you edit it with GraphicsGale. The other version costs 1,995
Alright, I've got my GraphicsGale, I've got my Orange Crush. What now?
Well, there are a couple of ways that this could go. I'll just explain my method of working with palettes- if you find another way that works for you, super. Note that you'll probably learn a lot better if you actually follow along and do what I'm doing- you can easily save the image I'm using and work with it yourself in GraphicsGale. Also, I am using the old DoR tileset, so you might want to get that as well.
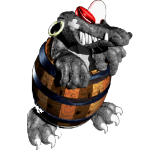
Alright, you found yourself a nice little sprite. Look, here he is!

But there is a tiny problem. When I rip him into my DoR tileset, he looks like this.

Ew. He has become palette barf. Let's try to fix him up, shall we? Our first step is getting GraphicsGale to open up the file- since it's a .gif, free version users need to convert it to another file type- preferably, 256-color .bmp. Open the oldman.gif in Paint. Go to File -> Save As. Where there is a "Save as Type" box, select "256-Color Bitmap (*.bmp;*.dib)" and save it. You don't have to change the name, but I always save it as something like "oldman bmp" so that I know that it's been converted and is ready for GraphicsGale. Speaking of which, it's time to double-click your GraphicsGale icon and open up "oldman bmp.bmp".

There are a lot of different things up there, but we're only worried about the three I boxed in.
Magnify Tool: When selected, left-clicking the image will zoom in and right-clicking will zoom out. You'll probably be using this quite a bit, because straining to see individual pixels is godawful.
Image: Pretty self-explanatory. Any changes made occur in real-time.
Palette Box: This is what we'll be working with. The palette box contains every color used by the image. You can move colors around using the mouse and keyboard. The color with a box around it is the color you have currently selected, and the box with a slash through it is what you have as a secondary color. By default, the secondary color is the last color used by the image- everything after that is solid black.
Alright, now that we've got our image, it's time to determine how many colors our old man uses. Now, looking at the palette box, you may think "Holy guacamole, that's a ton of colors for one old man!" but if you look, you'll see that there's also the background color, fire, and walls that we're not worried about ripping in. What we'll do is move the colors around- if something on the old man changes, we know that we've moved a color that he uses. You pickin' up what I'm layin' down so far?
Time for the in-depth explanation- we're going to create a new color, called the "Tester." Just select a random square and adjust the R/G/B slider to get a color.

It doesn't matter where you put the new color or what specific color it is- just make sure it's something that stands out.
Now we're going to test each color to see which are used in the image. Since I'm the teacher, I already know the answers, so go ahead and drag the white that's boxed in on the above image to your Tester. What happens to the old guy?

Great, you ruined it. No worries, you can get it back. Just drag the white color back to your Tester- good as new. Now, drag the same white to an unused black square, but hold the shift key while doing so! This will move the white color to a new spot on the palette without affecting the image. This allows you to put the colors that the image uses together without destroying the image. Now go through on you own to find all the colors that the oldguy uses, including the background color. I'll just go grab a Juicy-Juice while you do that.
Done already? You should have something that looks like this:

Remember, since we were using the shift key while moving those colors, the image should be unaltered. Now let's organize them. Try to group the colors together as best you can, remembering to use your Tester to determine whether something is a dark red or a dark brown. The end result is something like this (note that I only posted a picture of one line to save space):

So we can see that we have our background color, three grays, five browns, and three reds. I just realized that I picked a bad image to use as our tutorial, because this won't actually fit into DoR. Nevertheless, we will sally forth. Speaking of which, go back to ZQuest and go to Quest -> Graphics -> Palettes -> Main and select CSet 6, then hit "Edit." You should see this bar in the center of your screen.

You'll be trying to emulate this palette structure. Since we have no grays, we'll just make his beard blue. Trust me, it'll be awesome. So, basically, we want to keep our background color to the first color in the palette, because that will be transparent in ZQuest, and organize the other colors accordingly. Here's how I did it:

Note that the last color is the darkest brown- it was close enough to black to substitute. Now simply save the image If you think you might want to grab other tiles from the image later, you might want to save under a different name- you may have ruined your chances at ripping other tiles when you edited the palette. Grab the tiles in ZQuest to get your recolored sprite!

There you have it- he's gone from palette barf to palette style, and it only took 9 images!
Why'd you break the image size limit on one picture?
Shut up.
Any last words?
Hope you learned a lot from this tutorial! Believe me, once you get the hang of it, GraphicsGale is so much easier and less time-consuming than recoloring each individual tile. You can pull off a lot of cool things that I didn't cover here- it's up to you to have the know-how to make your ideas happen. And remember, when you're moving colors, think about whether to shift or not- it could just save your life.