Relational Mode for Minish Cap Water & Ice

Overview
Creator:
Lüt
Added: 13 May 2017
Downloads: 95
|
Download Tile (1302.43 KB) |
||
| Tags: 16-color, Collection, Dance_of_Remembrance, Dungeon, Edited, Overworld, Ripped, Water | |||
")
Information
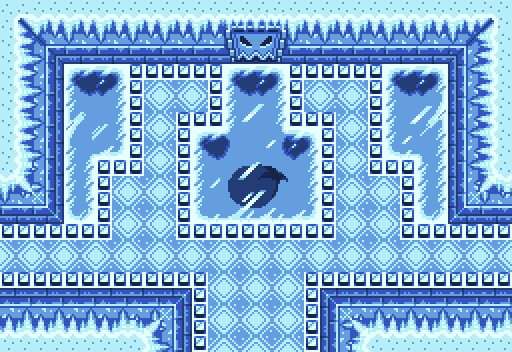
This tilesheet collection takes the water and ice tiles from The Legend Of Zelda: The Minish Cap and organizes them for usage with ZQuest's relational drawing mode. It also contains a number of alternate tiles for fine-tuning, and an assortment of additional tiles that present the complete sets exactly as they appear in the original game, along with my own revised and expanded ice tiles.


About Reviews
Description
About The "Relational Mode for Minish Cap Water & Ice" Pack:
This tilesheet collection takes the water and ice tiles from The Legend Of Zelda: The Minish Cap and organizes them for usage with ZQuest's relational drawing mode. It also contains a number of alternate tiles for fine-tuning, and an assortment of additional tiles that present the complete sets exactly as they appear in the original game.
Furthermore, this package also includes my own revised and expanded ice tiles. As I was compiling the original tiles, I was surprised by how jagged and choppy they were, so I created an alternate tile collection that flows far more smoothly. This collection also features more light refraction beams, additional variations of the flower tiles for greater placement versatility, and a number of layerable options.
The tilesheets are organized in 5 sets of 4 columns to match the standard combo index, and are colored for usage with the Dance of Remembrance: Hybrid tileset. Each sheet is available in 2 palette options: one for overworlds and one for dungeons. There are 8 sheets in this collection:
1+2) "RM for MC Ice - Orig - [DoRH dngn / DoRH owld]": Original ice tiles for those who want "true" Minish Cap ice. Column sets 1, 3, and 5 are the relational mode tile configurations. Column sets 2 and 4 are the alternate / additional tiles for column sets 1 and 3. Column sets 1 and 2 are for general usage. Column sets 3 and 4 are for water edges and pit borders. Column set 5 is for ice block barriers.
3+4) "RM for MC Ice - Rev Pg01 - [DoRH dngn / DoRH owld]": Revised ice tiles, 1st page. Column sets function the same as above.
5+6) "RM for MC Ice - Rev Pg02 - [DoRH dngn / DoRH owld]": Revised ice tiles, 2nd page. Column sets 1, 2, and 3 are for general usage. Column sets 4 and 5 are for layers.
7+8) "RM for MC Water - [DoRH dngn / DoRH owld]": Water tiles. Column set 1 is the primary relational mode tile configuration. Column sets 2 - 4 complete column set 1's animation cycle. Column set 5 is the alternate / additional tiles. Column sets 1 - 4 use a 4-frame animation with a 3-frame skip. Column set 5 uses a 4-frame animation with no frame skip.
Although these tilesheets are colored for Dance of Remembrance: Hybrid, they will work in any tileset that has a matching palette.
Importing The Tilesheets:
1) Using the Dance of Remembrance: Hybrid tileset, select any map screen with content, and press F4 to load the "Select Palette" menu. If you have no screens with content, place a combo on a blank screen to create one.
2) The filename and tilesheet header both indicate the Palette and CSet necessary to accurately import the tilesheet. Pick the matching Palette from the "Select Palette" drop-down, click "OK," then press + or - to match the CSet.
3) Open the tile page by going to "Quest" -> "Graphics" -> "Tiles," or by right-clicking any combo in the combo list and selecting "Open Tile Page."
4) Find any blank page, select the tile at the upper left, and click the "Grab" button to open the tile import interface.
5) On the "Grab Tile(s)" page, click the "File" button, and choose the filename of the tilesheet you want to import.
6) Once loaded, the colors may look strange, so click the "Recolor" button. If your Palette and CSet are correct (per step 2), the colors of the imported tilesheet will now match the original tilesheet. (Note that CSet can still be adjusted at this point.)
7) Because the "Grab Tile(s)" page only displays 10 of the full 13 rows of a tilesheet, you will need to perform the grab process twice to complete each import.
7a) Select the tile at the upper left, hold shift, then select the tile at the lower right. With the selection box flashing around the entire tile collection, click "OK" to import the tiles.
7b) Now back on the tile page, there will be 3 empty rows beneath the imported tiles. Select the tile at the left side of the first empty row, and click the "Grab" button again. Press the down arrow on your keyboard 3 times to shift the "Grab Tile(s)" display down 3 rows, then load the final 3 rows in the same way as the first 10 rows. (You may need to click the "Recolor" button again during this step.)
8) The tilesheet will now be fully imported with correct colors. Next, to use them in your screens, make them into combos.
Creating Combos:
1) These tilesheets are organized in column sets of 4 to match the standard combo index. On the tile page, select a set of 4 columns by clicking the tile at the upper left, holding shift, then clicking the tile at the bottom right. If your selection stretches across the entire tile page instead of only 4 columns, press spacebar to switch your selection mode from row-based to grid-based.
2) Press "M" to Make this selection of tiles into a group of combos. IMPORTANT NOTE: Pressing "M" after editing any tile in any way, including copying or pasting a tile, can cause glitches in your edits, your tile pages, and even your combo list. Always close and re-open the tile page before pressing "M" to prevent this.
3) On the "Select Combo" page, find a group of blank combos (indicated by red squares) large enough to fit all the tiles being made into combos, select the first combo, and press "Done." IMPORTANT NOTE: This process does NOT shift existing combos further down the list to create room for the new combos being made, so any existing combos in the way of the new combos will be overwritten.
4) You will now see the combo editor. The settings chosen here will be applied to ALL combos being made. This particular pack includes tilesheets for both water and ice, which must be set up differently.
4a) Ice (relational and additional): ice needs no further configuration in the combo editor. However, if you want your ice to slow the player down, select "Slow Walk" from the "Type" dropdown. Click "OK" to make your tiles into combos. (Do not use "Slow Walk" type with layerable ice combos.)
4b) Water (relational): Use only the first column set of the 4 relational column sets to make your relational water combos; the following 3 column sets are for the animation. Set "A.Frames" to 4, "A.Speed" to 10, and "A.SkipX" to 3 to configure the animation. Set "Type" to "Water." In the top row of 3 squares, use the second square to set walkability; if you want your water to block the player from crossing without a ladder or flippers, click the 4 quadrants solid (pink); if you want the player to drown in the water using the "Link Drowns in Walkable Water" quest rule, leave the 4 quadrants walkable (gray). Click "OK" to make your tiles into combos.
4c) Water (additional): Use only the first column of the 5th column set to make your additonal water combos; the following 3 columns are for the animation. Set "A.Frames" to 4, "A.Speed" to 10, but leave "A.SkipX" at 0 to configure the animation. Set "Type" to "Water." Determine walkability as above. Click "OK" to make your tiles into combos. When asked "Limit to 1 column?" answer "No." (Do not use "Water" type with layerable ripple animations.)
5) This pack also includes layerable ice block barriers, which require per-combo walkability adjustments. After making these into combos, right-click each individual combo in the combo list, and select "Edit Combo." In the top row of 3 squares, the first square will display the tile being used, and the second square will display its walkability. For every ice block graphic in the first square, click the matching quadrant in the second square to turn it solid (pink).
6) For organizational purposes, I suggest leaving a row of blank combos between the relational mode configurations and the alternate / additional combos.
Using Relational Mode:
1) ZQuest supports 4 drawing modes: Normal, Relational, Dungeon Carving, and Alias. Press "o" to cycle through these modes until you reach "Relational." A button at the top right of the screen editor will show which mode you are using. IMPORTANT NOTE: Do NOT click the button to change modes; it will cause them to glitch. Only ever use "o" to change modes. (This is reported to be fixed in ZC 2.50.3.)
2) Select the first combo of the relational configuration.
3) Click and drag your cursor around the screen to build your body of water or ice.
4) Hold shift while clicking and dragging to erase your body of water or ice.
5) Relational data is stored per screen and per usage of the mode. While editing a screen, you can hold and lift your cursor as many times as you want; the mode will continuously connect and disconnect everything you've drawn as if it were one large relational structure. However, if you leave the screen, or exit the mode, your structural data will be lost, and you'll have to redraw your previous work IF you want to continue building off of it. To be clear, this does NOT mean that your placed combos will be erased; only that the relational data that links them together will be lost. This can be useful if you're building multiple relational structures that you don't want to be connected; for example, separate bodies of water and ice on the same screen.
Detailed instructions with images are included in this package.
Credits
Radien's DoR crew for the base Minish Cap water tiles in Dance of Remembrance.
Rocktyt for the rip of Minish Cap's Temple of Droplets map.
Everything else by me.
Rocktyt for the rip of Minish Cap's Temple of Droplets map.
Everything else by me.


