

How to Edit Items in the 2.5 betas
A tutorial by Joe123.
Table of Contents
- What is the Item Editor?
- The Item Select Dialog
- The Data Tab
- The GFX Tab
- The Pickup Tab
- The Action Tab
- The Arguments Tab
- Creating a New Item
For those of you new to Zelda Classic, or who have only just become familiar with the 2.5-betas, the Item Editor is a tool which has been added to the more-recent versions of the program, allowing the designer much more control over the items Link can use in the quest.
Back in 2.10, the number of items in a quest was restricted to a set list, and the designer had no control over the function of any of those items - other than changing their graphics.
Now, almost every aspect of an item can be changed to fit the designer's needs, as well as the addition of new items - which may even have completely new effects with the help of scripting.
The Item Editor can be found in ZQuest by clicking on Quest->Items.
2. The Item Select Dialog
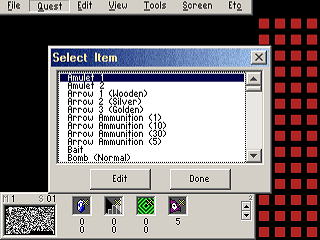
Upon opening the Item Editor, you should first come to this screen.
This dialog box allows you to select which item you want to edit the properties of, and to create new items.
To edit the properties of a pre-existing item, just double click on its name, or move the cursor to it and press 'Edit'.
When creating a new item, there are a set of items with blank properties, starting with the name 'Custom Item 01', through to 'Custom Item 20'.
If you edit the properties of one of these items, you are essentially creating a new item.
Should you find you need more than 20 custom items, if you scroll down to the end of the named items, you will come across a list of items with the name 'z###'.
These items are also blank, and can be used in exactly the same way as the 'Custom Item ##'s.
When you're finished, if you press 'Esc' on your keyboard, or the 'Done' button, you'll return to ZQuest's main interface.
*Note- If you press a letter key in the Item Select Dialog, you will scroll down to the first item (alphabetically) starting with that letter name.
3. The Data Tab
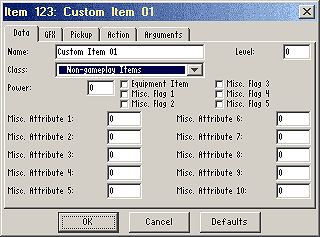
When you start to edit the properties of an item, you should first come to the 'Data' Tab.
For the sake of this tutorial, I've decided to use 'Custom Item 01', as all of it's information is blank.
This tab allows you to edit the basic properties of an item, such as its name, the amount of damage it'll deal to an enemy, whether it should appear on the subscreen etc.
*Note- If pressed, the 'Defaults' button will reset the item to how it was set up on the Default 'The Legend of Zelda' Template.
- The Top Bar
- Item Classes and Levels
- Misc. Properties of Items
A. The Top Bar
The first thing to note is the bar at the top.
This contains the 'Item Reference Number', and the item's current name.
The Item Reference (or ID) Number is often an essential piece of information to know about an item when using it alongside a script.
The primary function of the item's name is for the Quest Builder to be able to organise his/her items, although it can also be used in conjunction with the 'Selected Item Name' object in the Subscreen Editor.
Beneath this you can see the tabs for the different parts of the Item Editor, which I will explain later on in this guide.
Below that is the box in which the name of the item can be changed.
B. Item Classes and Levels
Now you can see a box where the item's 'Level' can be modified.
An item's level is a very important characteristic, which is linked to its 'Class'.
The 'Class' of an item determines how it will function. It is almost like the 'family' that the item belongs to.
If you click on the arrow, you'll see a drop-down menu of all the 'Item Classes' in your Quest.
This contains all of the different types of items in Zelda Classic, and some blank Item Classes (z###), which are reserved mostly for scripted items.
If you were to give an item the 'Sword' class, when Link acquired that item, the sword of the corresponding level would appear in his subscreen.
So if given the Class 'Swords', and the level '1', this 'Custom Item 01' would now gain most of the properties of the Wooden Sword.
The level number determines which item in that Item Class has priority in the subscreen.
If you think back to The Legend of Zelda, when Link gets the White Sword, he can no-longer use the Wooden Sword.
This is becase the White Sword has Level '2', and the Wooden Sword has Level '1' (go check if you like), so when Link gets the White Sword, although he still has the Wooden Sword in his inventory, he can no longer use it, as he now has a higher-level item of the same Item Class.
The 'Equipment Item' flag determines whether an item will remain in Link's Inventory when he picks it up.
So, for a Boomerang, you'd want this checked - as the Boomerang enters Link's inventory when he picks it up, but for a Rupee you wouldn't - as Link doesn't wield Rupees at his foes.
C. Misc. Properties of Items
The 'Power' box determines how much damage an offensive weapon will deal to an enemy when Link uses it on them. A weapon with Power '1' will deal '2' damage to an enemy.
This box, as well as all of the 'Misc.' boxes and flags will change depending on which Item Class is being edited.
4. The GFX Tab

The next tab along is the 'GFX', or 'Graphics' tab.
This tab contains the information for how the item will look before it is picked up by Link, and while it is in the Subscreen, but not when Link is actually using it.
- Basic Graphics/Animation
- Other Graphical Effects
- Link Tile Modification
A. Basic Graphics/Animation
If you click on the black box, you'll be taken to the tilesheet, where you can select which tile you want the item to use. You can also change its CSet using the +/- keys on the numerical keyboard. This data will be shown to the right of the black box.
The 'Animation Frames' and 'Animation Speed' boxes work in exactly the same way as when editing a combo; an animation of the stated number of tiles, starting from the tile selected in the box, at the stated speed (in frames), which will loop.
The 'Initial Delay' box allows the item's animation to remain on the first tile for the stated number of frames before continuing with the animation.
B. Other Graphical Effects
If the 'Flash' flag is checked, the item will flash between it's current CSet and the CSet denoted in the 'Flash CSet' box.
The '2-Hand' box tells the system whether Link should hold the item up with the '1 hand' graphic or the '2 hand' graphic, when the 'Hold Up Item' Screen Flag is checked.
The 'Test' button allows you to see how your item will animate without opening up Zelda Classic.
When the 'If Possible, Use Slash Tiles' flag is checked, Link will use his slash tile graphics when the item is activated, (as set on the Action tab) if he has learned slash ability. This only affects 'Swords' and 'Wands' Item Classes.
C. Link Tile Modification
If an item has a 'Link Tile Modification' (often refered to as 'LTM'), when Link acquires the item, all of the tiles he uses on the tile-page are shifted right by this value. A negative value will shift them left. This allows for effects such as Link's graphic changing when he picks up a new shield. Link Tile Modifiers are cumulative, so if Link has two items, both with a Link Tile Modification of 20, his tiles will be moved along by 40 on the tilepage.
5. The Pickup Tab
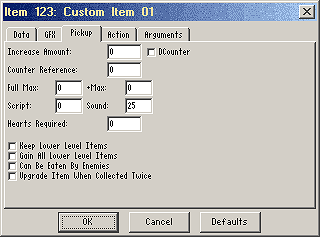
This tab lets the designer edit what will happen when Link picks up an item.
It is mostly for items that increase a game counter (such as rupees or bombs) when picked up, but can also have uses for other items.
- Game Counter Re-fill Boxes
- Game Counter Increase Boxes
- Other Pickup Effect Boxes
- Flags
A. Game Counter Re-fill Boxes
The first three boxes, 'Increase Amount', 'Counter Reference' and 'DCounter' are used mostly for re-filling items, such as bombs or hearts.
The 'Counter Reference' box on this tab tells the system which 'Game Counter' you want the item to increase when it is picked up. Some items also use the 'DCounter' (or 'Drain Counter') flag. This is just a technicallity - it must be checked for some counters and not for others.
Here is the list of Game Counters:
- 0: Life
- 1: Rupees (uses DCounter)
- 2: Bombs
- 3: Arrows
- 4: Magic (uses DCounter)
- 5: Keys
- 6: Super Bombs
For example:
An item with 'Increase Amount' of 3, 'DCounter' checked and 'Counter Reference' of 1 will increase Link's Rupees by three.
*Note- To heal Link's hearts by one, you will need to fill in '16' in the Increase Amount box, and to re-fill his magic by one magic bar, you will need to put '32'.
B. Game Counter Increase Boxes
The next two boxes, 'Full Max' and '+Max' are used for items which actually increase the maximum value of Link's Game Counter by a certain amount (for example, giving him a new heart container, or a larger bomb bag).
'Full Max' is the highest amount this type of item can increase the Game Counter to, and '+Max' is the amount one of these items will increase the Game Counter by.
So, for something like a Bomb Bag or Quiver, where Link may pick up 3 different versions of the item throughout the game, each slightly larger than the last, 'Full Max' and '+Max' would be the same, because you want to set the maximum for the bomb or arrow Game Counter to one value, then leave it at that value until Link picks up a new, higher level item.
For an item such as a Heart Container or a Magic Jar, 'Full Max' would be equivallent to the maximum number of hearts/magic Link can have, and '+Max' should be set to the amount you want Link's maximum hearts/magic to increase by each time he picks up one of those items; as the Quest Maker is likely to give him more than one heart container.
C. Other Pickup Effect Boxes
The 'Script' box in this tab will activate the corresponding script when Link picks up the item, and the 'Sound' box will play the corresponding sound effect.
The 'Hearts Required' box can be used to create an effect similar to the white/magic swords in The Legend of Zelda.
If Link is trying to pick up the item from a room with a string, guy and special item, he will not be able to unless he has the number of hearts denoted in the box.
For all of these boxes, if left as '0', they are ignored.
D. Flags
The last few tick-boxes are some miscellaneous flags which may be useful for any item.
- Keep Lower Level Items: If Link had previously collected lower-level items of the same item class, then the lower-level items are not removed from his inventory when this item is collected.
- Gain All Lower Level Items: When Link collects this item, all lower-level items of the same class are added to his inventory. This means that if this item is destroyed or eaten, Link will revert to the next highest item of the same class.
- Can Be Eaten By Enemies: If Link is engulfed by a Like Like, this item will be removed from his inventory if he doesn't escape quickly enough.
- Upgrade Item When Collected Twice: Getting two of this item gives one of the same class but higher level. In The Legend of Zelda, collecting a Blue Potion while already possessing a Blue Potion would cause Link to obtain a Red Potion.
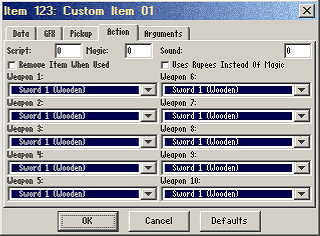
In this tab, you can modify the effect an item will have when used.
- Action Effect Boxes
- Action Effect Flags
- Weapon Sprites
A. Action Effect Boxes
The 'Script' box in this tab will activate the corresponding script when Link activates the item, and so is useful for creating items with new effects.
The 'Sound' box will play the corresponding sound effect when Link uses the item.
The 'Magic' box will remove the denoted amount of magic from Link's Magic Game Counter when the item is used, and disallow usage of the item if he does not have enough magic.
B. Action Effect Flags
The 'Remove Item When Used' flag will remove that item from Link's inventory after usage. It is useful for items such as the Potions from The Legend of Zelda.
The 'Use Rupees Instead of Magic' item will take-away Rupees from Link when the item is activated, rather than magic, with an effect similar to the Magic Armour in Twilight Princess.
C. Weapon Sprites
These boxes correspond to a sprite in the 'Weapons/Misc. Sprites' menu, and denote which graphic appears when Link uses an item - for example, if editing the 'Wooden Arrow' item, the first box on this list will be the 'Wooden Arrow' Weapon/Misc. sprite.
They are labelled with what they change for each item class when editing.
7. The Arguments Tab

This tab is reserved completely for scripting.
It allows customisation of scripts after compiling - a set of 8 user-defined integers for ZScript and ZASM, and two extra which can be used only with ZASM.
These integers are declared within the 'void run(){' command of an item script (running from D0, which is declared first, along to D7, which is declared last), and can then be modified in-program.
8. Creating a New Item
I will now guide you through the process of creating a new item from scratch, using the 'Custom Item 01' entry.
You will probably learn best how to do this by actually creating the item in ZQuest yourself at the same time.
The item we will be creating will be a Level 2 Hammer, which is more powerful than the original hammer, and when picked up, will also allow Link to carry more Bombs. Seeing as it'll be so powerful, let's also make it use up some magic.
So, the first thing we do is to open up the Item Select Dialog, and scroll down to 'Custom Item 01'.
Double click on it to start editing its properties on the 'Data Tab'.
Now, if it's still called 'Custom Item 01', we'll never remember that it's our new hammer, so let's re-name it.
Mine's going to be called 'Super Hammer'.
Obviously, changing the 'Class' is very important, is it gives the item almost all of its properties, so we'll now change its Item Class to 'Hammers'.
If you look over to the original 'Hammer' item, you'll see that it has a level of '1'.
This means that if we give our Hammer level '2', when Link picks it up, it'll replace the old one in the subscreen.
Obviously we do want it to remain on the subscreen, so the 'Equipment Item' box should be checked.
And we want it to be more powerful than the previous hammer, which has a power of '4', so I'll set this new hammer's power to "6," making it deal 12 HP damage to enemies.
*Note- The name in the top bar hasn't changed. Rest assured that after we finish editing the item and come back to it, it will have done.
Now, we want to edit the item's graphics.
Firstly, let's set it to a tile.
For the purpose of this tutorial, I'll assume you're using the Default 'The Legend of Zelda' Tileset.
Scroll down to page 87, and select tile 22740 in CSet 8. This is how our new hammer will look.
This hammer uses 8 tiles of animation, and a speed of 10 is quite nice, so set that in the boxes.
We want it remain on the first tile for 5 frames, so we set the 'Initial Delay' box to 5.
You don't want the hammer to change how Link looks, so don't set it a Link Tile Modifier, and it's not a Sword or a Wand, so it doesn't need the 'If Possible, Use Slash Tiles' flag.
It's quite an important item, so we want Link to hold it up with 2 hands, and so we can check that box.
If you then want to check that you've set it up properly, press the 'Test' button to look.
We said we wanted the hammer to increase how many bombs Link can hold.
So firstly, we have to find the corresponding game counter for bombs, '2'.
30 bombs is a nice amount, so we'll set both 'Full Max' and '+Max' to 30. This allows the item to increase Link's bombs up to a maximum of 30, then tells the system to do so. You might think that sounds a bit long-winded, but it is useful when creating other items.
For the sake of the tutorial, let's have it fill up Link's bombs when he gets it too.
To do that, set the 'increase amount' box to 30 (and make sure the DCounter flag isn't checked).
We don't want Link to loose his old hammer when he gets this one, so let's check the 'Keep Lower Level Items' flag.
The last part to set up is the action tab.
We want our hammer to take up magic when Link swings it, so firstly let's set the magic box to '16'; half a magic container.
The system's default 'Pound Sound' is 16, so we'll set that for this hammer too.
Finally, we need to set which sprite the hammer will use.
The first drop-down menu is the graphic for when Link swings the hammer, and we want that to be the 'Hammer' sprite.
The second one is the little cracks that are displayed on the floor after the hammer hits, and so that'll be the 'MISC: Hammer Impact' sprite.
And there we have it!
A more powerful hammer, which increases how many bombs Link can hold, and takes up magic to use!
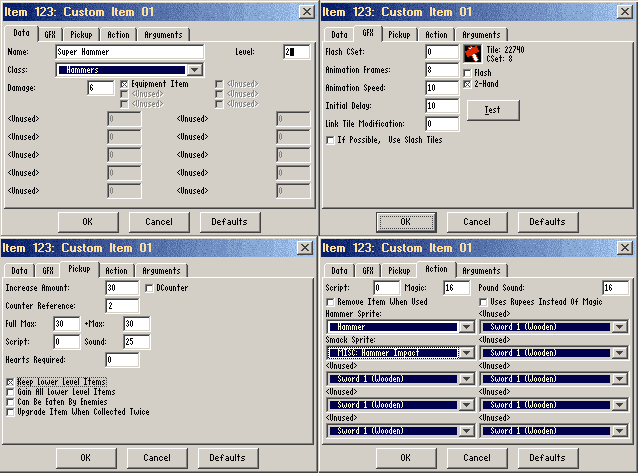
Here's how my item looked after I'd finished.
Credits:
ZC Wiki Item Editor Page - some information I wasn't sure on beforehand
jerome - request for tutorial

